欢迎您访问广东某某机械环保科有限公司网站,公司主营某某机械、某某设备、某某模具等产品!
全国咨询热线: 400-123-4567


 新闻资讯
新闻资讯 哈希游戏| 哈希游戏平台| 哈希游戏APP
哈希游戏- 哈希游戏平台- 哈希游戏官方网站哈苏相机的使用方法胶卷安装需要感光层对镜头方向(这句线胶卷是有防光纸,倒过来卷看上去有点别扭)!黑面朝上胶卷安装好以后,看到计数器为0,先上弦(前面一个摇把)!否则第一张就会空卷!然后摇后面那个卷片把手直到出现数字1(不摇到数字1出现,边上小孔没有呈现白色,快门是没法释放的),这时数字孔边上的小孔出现白色(快门释放后为红色,以提醒你需要上弦),抽出遮光板(这是给你换后盖时用的)才能释放快门,然后不需要再装上遮光板,连续拍摄(不要卷卷片把手!直接上弦),直到第12张拍完(快门释放完),这时不能再卷上弦把手(卷了快门也无法释放,显得快门被卡住,需要把后盖取下才能释放,所以第13张应该是不能拍)!这时需要用卷片把手把胶卷后面的防护纸都卷完(卷到手感空了为止),取出胶卷即可。
@ The Super-Lite II has a unique automatic light output stabilizer. The light output of many other electronic flash units considerably decreases as you keep flashing the units. This means you will have to open up your lens aperture. The light output of some unjts goes down to as much as one f/stop extent after 40 flashes . The light output stabilizer of the Super-Lite II constantly maintains its output at its maximum at each flash.

希 望 您 的 全 新 LEICA X2能 为 您 带 来 无 比 的 乐 趣 与 成 就 , 高 性 能 LEICA DC ELMARIT 1: 2.8/24 mm ASPH. 镜 头 将 为 您 提 供 绝 佳 的 照片品质。 LEICA X2 的 全 自 动 程 设 曝 光 控 制 模 式 和 自 动 闪 光 功 能 , 能 让 您轻松享受拍照乐趣。您也可以随时使用手动设定,自行完 成构图。 如果在曝光难度非常高的条件下拍照,您可以选择各种不同 的特殊功能改善照片品质。 请 仔 细 阅 读 本 手 册 , 充 分 掌 握 LEICA X2 的 所 有 功 能 。

原来的Xpan相机是用简单的LED显示曝光信息.实心的红圈表示曝光正确.加号表示曝光过度.减号表示曝光不足从原理上讲,这个系统没有问题.但在实际拍摄时.如果处在明亮的光线环境中,这些指示很难看清楚.这个问题已经在新型号中解决了.新型号应用LCD面板显示符号.这些符号有黑色的背景,即使在明亮的环境中也能看清楚.曝光指示符号也改为两个简单的箭头符号指示曝光过度和不足,两个箭头同时亮说明曝光正确.另一项改进之处是增加了快门速度信息显示。
[2006-06-12 10:38 补充如下] 12、由老哈苏提供的503cw中文说明书篇二:哈苏xpanⅱ说明书篇三:哈苏快速选择指南目录1. 预备知识:哈苏镜头标识符号2. faqs3. 快速选择指南4. 1600f和1000f型配套镜头5. c系列镜头6. c系列带t*镀膜镜头7. cf系列镜头8. 501c型机身专配c型标准镜头9. cb系列镜头10. f系列镜头11. fe (tcc)系列镜头12. cfe系列镜头13. arcbody型机身配套镜头14. 特殊镜头及附件附录a: 在焦平面快门机身上使用叶片式镜间快门镜头b: 如何使用c系列镜头上的绿色完整秒时刻度c: 滤镜d: 建议阅读e: 购买二手哈苏镜头注意事项1. 预备知识:哈苏镜头标识符号——————————尽管具有众多不同型号的机身和镜头,哈苏中片幅系统还算是易于掌握的。
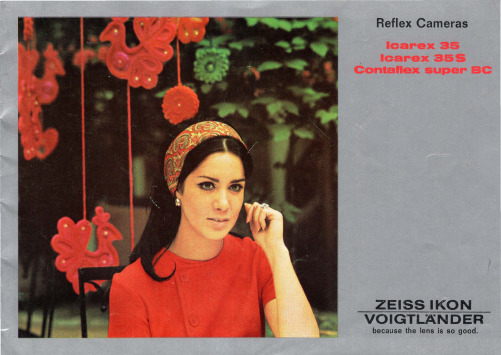
If photography is yourfavourite hobby, if what you want is not just to preserve memories, but also to experiment and solve professional problems with your camera, then the ICAREX 35 is ideal for you! It is extremely versatile, especially in the close-up range,

struction Machined aluminium. Tripod socket 1/4”.Sensor Type CMOS, 50 megapixels (8272 6200 pixels, 5.3 5.3 m).Sensor Dimensions43.8 32.9 mmImage Size Stills: 3FR RAW capture 106 MB on average. JPEG: Up to 22 MB, TIFF 8 bit: 154 MB. Video: 2.7K (2720 x 1530) and HD (1920 x 1080), max 29:59 minutes/clip). Video covers the full sensor width in a 16:9 ratio.File Format Hasselblad 3FR RAW, Full size JPEG. Video: H.264 Compressed (29.97 fps). 4:2:0 8 bit color. Shooting Mode Single shot stills, Video. Single and Continuous Drive, Self Timer, Interval Timer, Exposure Brack-eting and Focus Bracketing.Colour Definition16-bit; Dynamic range up to 14 stops.ISO Speed Range ISO Auto, 100, 200, 400, 800, 1600, 3200, 6400, 12800, 25600.Storage Options Dual UHS-II SD cards or tethered to Mac or PC. Max 1 TB. SD Cards can be used in Overflow or Backup mode (images only). Recommended cards are listed below.Colour Management Hasselblad Natural Colour Solution (HNCS)Storage Capacity A 64 GB card holds approximately 600 RAW or 6000 JPEG High Quality images on average.Capture Rate 2.7 frames per second (RAW)User Interface Touch interface including swipe, scroll and pinch/spread to zoom. Camera grip with buttons and Scroll Wheels. Many camera functions and settings can be controlled from a tethered computer or iPad Pro/iPad Air (2019) over Wi-Fi or tethered.Display 3.6-inch TFT type, 24-bit colour, 2.36-million-dot; Touch functionality: Full supportLive View On camera and host computer with high frame rate.Viewfinder OLED, 3.69-million-dot Electronic Viewfinder (EVF). Viewing Area : 100%. Magnification: 0.87x Histogram Feedback Yes, in Browse Mode on rear display and in EVF.IR Filter Mounted in front of sensor.Acoustic Feedback YesSoftware Phocus for Mac and Windows. Compatible with Adobe Photoshop Lightroom and Adobe Camera RawPhocus Mobile 2 for iPad Pro and iPad Air (2019).Platform Support Macintosh: OS X version 10.12.2 or later. PC: XP/Vista/Windows 7 (32 and 64 bit)/ 8 / 10. iOS device Support iPad Pro or iPad Air (2019 or later)Host Connection Type USB 3.0 (5 Gbit/s) Type-C connector.Additional Connec-tions Audio In/Out.Operating Tempera-ture-10 to 45 ˚C. 14 to 113 ˚F.Wi-Fi & GPS802.11 b, g, n, a, ac (a and ac depending on region). GPS built-in.RECOMMENDED MEMORY CARDSFor optimal performance of the X1D II 50C, the following SD memory cards are recommended to use:●atible with all H System lenses and some H System accessories using an XH Lens Adapter. Also compatible with V System and XPan Lenses using a XV or XPan Lens Adapter. Many other lenses via 3rd party lens adapters (E-shutter only).Shutter Electronically controlled lens shutter with speeds up to 1/2000 s. Flash sync at all speeds. Option-al electronic shutterShutter Speed Range68 minutes to 1/2000 s with XCD Lenses. 1/800 s or 1/2000 s with HC/HCD Lenses. Electronic shutter 68 min to 1/10000 s.Flash Sync Speed Flash can be used at all shutter speeds. Mechanical shutter only.Flash Control TTL centre weighted system. Compatible with Nikon TM System flashes. ISO range 100 to 6400. Flash output can be adjusted (-3 to +3 EV) for fill-in purposes independent of ambient light. Sync at all shutter speeds. Mechanical shutter only.Flash Compatibility In TTL-mode, the following Nikon Flash products can be used: SB-300, SB-500, SB-5000, SB-700, SB-900, SB-910.The following Profoto products can be used in TTL-mode: A1, B1 and B2 with Nikon interface.Focusing Automatic and manual focusing. Instant manual focus override. Automatic focusing using contrast detection. 100% zoom or Focus Peaking available in manual focus. Up to 117 selectable autofocus points.Exposure Metering Spot, centre weighted and centre spot.Power Supply Rechargeable Li-ion battery (7.27 VDC/3400 mAh). Compatible with the 3200 mAh battery.Can be charged in camera via USB or with optional external charger.Dimensions Complete camera with XCD 45P lens: 148 x 97 x 102 mm [W x H x D].Camera Body only: 148 x 97 x 70 mmWeight1086 g (Complete camera with XCD 45P lens, Li-ion battery and card).650 g (Camera Body). 766 g (Camera Body with Li-ion battery and SD Card).Specification subject to change without notice.。
显示LCD(背光)LED模式 6绿,旋钮选择x 2红框图终端前面板手机后面板输出L(MONO),R个人赶出左,右MIDI IN / OUT / THRU尺寸480(宽)x 235(深)x 44(高)mm重量2.6千克美国消耗功率120V(60Hz)的12.0瓦欧洲240V(50Hz)的12.0瓦随附配件用户手册,数据列表,AC电源线 网页翻译由提供在这本小册子的说明和照片仅供参考,和规格如有变更,恕不另行通知。

GUIDA RAPIDA-3EV +/--2-3-11Eseguire uno swipe per schiarire/scurire.Sfiorare per catturare una foto/video.1252506030-1TimeEV +/-1/70 s -0.3 EVSELETTORE MODALIT FOTOCAMERAAjustesTemporizadorCuadrculasBloqueo F/EAnti-VibracinRAW+JPGRapid FireTiltmeterHistogramaEstndarAPCManualProporcin4:3PANNELLO DI CONTROLLOA: MODALITA AUTOMATICAIn modalit automatica, la fotocamera seleziona automaticamente le migliori impostazioni possibili per la scena corrente. Utilizzare il cerchio diesposizione o la compensazione dell‘esposizione (EV) per scurire/ridurre l‘immagine.M: MODALITA MANUALEIn modalit completamente manuale, possibile comporre valori personalizzati per il tempo diesposizione e ISO sfiorando il valore corrispondente visualizzato in alto.SI: MODALITA SEMI AUTOMATICASfiorare ancora una volta M per passare allamodalit a priorit ISO dell‘otturatore (SI). Comporre un valore specifico per il tempo di esposizione o ISO e ProCamera regoler automaticamente l‘altro valore per la migliore esposizione possibile. inoltre possibile utilizzare la compensazionedell‘esposizione (EV) per scurire/ridurre l‘immagine.APC: CORREZIONE DELLA PROSPETTIVA AUTOMATICAAttivare APC per visualizzare un pulsantecorrispondente sullo schermo di cattura. Sfiorare questo pulsante per attivare la correzione prospettica in tempo reale. Questa funzionepremium fa parte dell‘abbonamento ProCamera Up.ISTOGRAMMAAttiva un Istogramma in diretta, che mostrer i livelli generali di luce. Il rosso sulla destra indica la sovraespo- sizione e sulla sinistra la sottoesposizione.RAPID FIRENella modalit Rapid Fire, puoi scattare in modo continuativo ad alta risoluzione e in rapida successione.BLOCCO F/EImposta l‘Esposizione e i Punti Focali per bloccarli quando il dito non tocca lo schermo.GRIGLIEVarie Visualizzazioni a griglia (Regola dei terzi, Rapporto aureo, ecc.) per assisterti nella composizione della foto.TILTMETROOrizzonte virtuale Sensore d‘inclinazione 3D per immagini perfettamente dritte.4:3RAPPORTO D’ASPETTOSfoglia i vari Formati immagine (4:3; 16:9; ecc.). Le foto RAW utilizzano il sensore al massimo e hanno un formato d‘immagine pari a 4:3.FORMATO FILEControlla il formato di file attivo o alterna con quelli disponibili sul tuo dispositivo.ANTISCOSSAAbilita l‘Anti-Scossa per il secondo pulsantedell‘Ottu- ratore. L‘Anti-Scossa ritarder il rilascio dell‘otturatore fino a quando l‘iPhone non sar tenuto in modo stabile, consentendo cos discattare immagini pi chiare e nitide. Consigliato per scattare RAW.AUTO TIMERAbilita il Self-Timer per il secondo pulsantedell‘Otturatore. Premi a lungo il Secondo Otturatore per impostazioni addizionali (ritardo e altre impostazioni di intervallo, ovvero ProTimer).MODALIT DISPLAYAlterna tra tre livelli di Modalit display su schermo. La modalit Standard mostra tutti gli elementi sullo schermo, mentre quella Light offre un‘esperienza minimalista.IMPOSTAZIONIApre le vaste impostazioni dell’app ProCamera, nel nostro shop in-app e la sezione di assistenza.FUSION CAMERANota: a causa delle limitazioni dell‘iOS, l‘obiettivo ultragrandangolare (0,5x) non consente la cattura RAW e ha una messa a fuoco fissa in questo momento.Una caratteristica speciale di ProCamera la possibilit di catturare foto sia con la fotocamera di fusione, che crea foto sorprendenti combinando le immagini di pi di un obiettivo, o in alternativa utilizzare un unico obiettivo con impostazioni personalizzate della fotocamera e uscita RAWPer le riprese generiche con dispositivi multi-lente, la fotocamera a fusione un‘ottima scelta, perch utilizza automaticamente le migliori impostazioni possibili della fotocamera e combina obiettivi multipli per un‘tabella seguente mostra le funzioni disponibili in modalit A e M/SI:MESSA A FUOCO ED ESPOSIZIONE• La fotocamera opera in Modalit Automatica quando non sono visibili le iconedi Messa a fuoco ed Esposizione. Quindi determiner automaticamente le impostazioni migliori per Messa a fuoco ed Esposizione.• Fai tap ovunque sullo schermo per impostare Messa a fuoco ed Esposizione nelpunto desiderato.• Fai tap al centro dello schermo per attivare la Modalit Automatica.• Fai tap al centro dello schermo in Modalit Automatica per dividere le icone F/E.Lo spostamento pi lieve fornir un accesso veloce per trascinare ogni icona nel punto desiderato.• Trascina l‘icona della Messa a fuoco direttamente fuori dal centro dello schermoin Modalit Automatica. C‘ inoltre un‘opzione nelle Impostazioni per trascinare prima fuori l‘Esposizione.• Premi a lungo l‘icona di Messa a fuoco (F) o quella di Esposizione (E) per bloccarla.I controlli F/E resteranno bloccati fino a quando non premerai a lungo per sbloccarli. In modalit blocco, F/E verranno bloccati automaticamente dopo che avrai spostato le icone in un nuovo punto.PULSANTI DEL VOLUME / PULSANTE CUFFIEPuoi scattare una foto utilizzando i pulsanti sull‘hardware, quelli per le cuffie o un telecomando Bluetooth.Si pu attivare questa funzione tramite Impostazioni Pulsanti del volume.PULSANTE DI SCATTO A SCHERMO INTEROAttiva Scatto a schermo intero nelle Impostazioni per scattare foto con un singolo tap dovunque sul mirino — ideale per la Fotografia Urbana. Quando questa funzione attiva, sar necessario premere a lungo per impostare F/E in un punto specifico o attivare la Modalit Automatica (invece del tap singolo quando la modalit Scatto a schermo intero disattivata).LIGHTBOXQuando abilitata, ProCamera salva foto e video nell‘app in un album dedicato,Lightbox. Questi file non saranno visibili nella cartella Foto di iOS a meno di non esportarli nella Libreria Foto di iOS (Rullino foto). Lightbox pu essere attivato tramite le Impostazioni.…Oltre al Lightbox standard, il nostro abbonamento ProCamera Up offre anche il …Private Lightbox“. La differenza che il Private Lightbox una cartella protetta accessibile solo tramite Face ID o l‘autenticazione Touch ID. Sfiora l‘icona della condivisione iOS per copiare un file o una selezione di file in una specifica posizione di salvataggio.QUICK FLICKPuoi accedere velocemente ai tuoi Album e Impostazioni utilizzando il trascinamen- to verso il bordo dello schermo di scatto. Trascina da sinistra a destra per aprire le Impostazioni e da destra a sinistra per accedere ai tuoi Album.VISUALIZZAZIONE EXIFSfiorare il pulsante …i“ quando si guarda una singola immagine per aprire il nostro visualizzatore Exif/Metadata . Fornir tutti i dettagli importanti per la cattura - quali le dimensioni del file, il tempo di esposizione e il tempo di cattura. Scorri all‘interno della tabella per passare alla visualizzazione della mappa corrispondente e al nostro Photo Compass.CATTURA E MODIFICA DELLE IMMAGINI RAWProCamera consente di catturare e modificare le foto in formato RAW. Dati principali di questo formato file spaciale:• Disponibile su tutti gli iPhone, a partire dall‘iPhone 6s.• Le foto RAW non sono progettate per essere visualizzate in quanto sono …foto non sviluppate“.• In Camera Roll, ci vogliono alcuni secondi perch il file RAW visualizzi un‘anteprima ad alta risoluzione.• I file RAW sono sempre in formato 4:3, il formato nativo del sensore della fotocamera.• I file RAW per definizione sono dati del sensore non elaborati, ci significa che non sono compatibili con le modalit di acquisizione basate sull‘elaborazione dei dati dell‘immagine (es. HDR o LowLight Plus).• Sui dispositivi multi-camera, l‘acquisizione RAW disponibile solo in modalit obiettivo singolo. Quando si seleziona RAW nel pannello di controllo, la fotocamera passa automaticamente alla modalit obiettivo singolo.• La nostra funzione antiscuotimento un ottimo modo per ridurre le vibrazioni della fotocamera per ottenere foto RAW pi nitide.• Nelle impostazioni possibile determinare il formato RAW preferito (solo RAW o RAW+JPG), che poi disponibile nel Pannello di controllo.• Lo zoom non disponibile quando si scatta in formato RAW.。

Hasselblad Master Ben Thomas about the X1D II 50C The outstanding color depth and the dynamic range of Hasselblad’s medium format sensor allow me to avoid spending hours correcting noisy shadows by hand, painting the affected/noisy areas as I did previously when shooting on SLR cameras. Hasselblad Master Ben Thomas about the X1D II 50C The X1D II 50C’s brilliant 3.6-inch 2.36-million-dot touch rear display and enhanced 3.69-million-dot OLED EVF are updated with higher resolution, enabling a more accurate post capture evaluation of images. With an improved magnification of 0.87x, the X1D II 50C’s EVF is now larger, letting you see the bigger picture. In addition, the menu system is now accessible when looking in the lity in the sunniest conditions. Building upon the previous generation’s intuitive user interface with pinch-to-zoom and swipe image browsing, the X1D II 50C is refined with a quicker overall response when navigating through its menu system. Further additions to the rear display include autofocus point drag and drop placement and autofocus point size changes with pinch/spread finger movement. With a quicker startup time, a live view with a faster refresh rate of 60 fps, and the shutter lag and black out time between frames reduced, the X1D II 50C creates an even smoother user experience. Along with many other features, the 1.2.0 Firmware release for the X1D II 50C adds video capture functionality. Video can be recorded at 29.97 fps with 4:2:0 8bit colour. The 2.7K resolution option delivers improved capture of detail, whilst balancing the final video capture size. The X1D II 50C’s updated electronic platform allows for a more responsive camera experience, including faster image previewing, enabling quicker post capture evaluation. In addition, a higher frame rate of 60fps makes live view smoother in both the EVF and the rear display. The much higher resolution of the rear display screen (1024x768) gives a more vivid, true to life image viewing experience. In addition, the X1D II 50C now enables full resolution high quality in-camera JPEG images with Hasselblad’s signature colours. Dual SD card slots, now supporting the faster UHS-II standard, ensure optimal storage space or the option to back up images to a second card when shooting. Built-in Wi-Fi and USB-C connectivity create a portable photographic workflow with wireless or tethered image export and tethered shooting using Phocus Mobile 2. Tethered shooting is also applicable with Phocus’ desktop version, available for both Mac and PC. An internal GPS module enables optional automatic geotagging of images. Dual SD card slots ensure optimal storage space or the option to back up images to a second card when shooting. The X1D II 50C enables in-camera battery charging via USB through a computer, charger or power bank. Read about Flora Borsis experience with the X1D Adopting the award-winning design of the first generation, the X1D II 50C continues with Hasselblad’s heritage of blending form and function seamlessly for a smooth handling experience.